If you spend any time building model railways, sooner or later you end up facing the same question:
What should I use for water?
There isn’t a single answer, and that’s partly why it gets confusing. Resin, scenic pour products, UV resin, PVA, gels —all get recommended, sometimes for completely different reasons.
After experimenting with most of them over the years, I’ve found the differences are less about “which looks the best” and more about behaviour. Each material does something slightly different, and the trick is matching that behaviour to the scene you’re building.
One thing that becomes obvious quite quickly is that the groundwork matters more than the product. If the base looks right, almost any clear medium will look better. If the base is wrong, even expensive resin and specialist ready-made water effects won’t save it.
A related point that’s easy to miss — especially with resin — is sealing the base before you pour anything. Porous materials like plaster, foam, or scenery layers can release trapped air, which creates bubbles, or in worst cases allow resin to seep through tiny gaps and leak. A simple sealing coat of acrylic paint, varnish, or diluted PVA avoids a lot of problems later.
Two-Part Resin — the depth champion
I find two-part resins, such as this one, sits at the top of the realism ladder when depth matters.
Because it cures as a solid transparent mass, light passes through it in a convincing way. Rivers, canals, docks and lakes gain a sense of volume that’s hard to achieve with anything else. If water is the centrepiece of a scene, resin is usually my go-to material.
It does ask for more care and takes longer.
Accurate mixing matters, and pouring in thinner layers rather than one deep pour can help reduces bubbles and heat buildup, which can deform surrounding terrain, particularly foam.
A lot of experienced modellers also add very subtle tint differences between layers, which creates a natural sense of depth without obvious colour.
Resin rewards patience — and that patience tends to show in the finished piece.
UV Resin — quick, but limited
UV resin often looks appealing because it cures quickly under a UV lamp or sunlight. For small details, that speed is genuinely useful — and it’s hard to argue with the convenience of something that goes from liquid to solid in under a minute.
Where it struggles is scale. Thicker pours don’t always cure evenly because UV light can only penetrate so far into the material, leaving the lower layers soft or tacky even when the surface appears set. Trapped bubbles are harder to remove because the working time is so short — with conventional resin you can tease bubbles out with a cocktail stick or a brief pass of heat; with UV resin, the window closes almost before you’ve noticed them. The cost also becomes noticeable quickly if you’re covering anything larger than a puddle or small stream, since it tends to come in small quantities priced for jewellery making rather than terrain work.
There’s also a subtler issue with finish. UV resins can yellow over time with continued UV exposure — which is slightly ironic given how they cure. For a display piece kept away from direct light it’s rarely a problem, but it’s worth knowing about for anything intended to last.
It’s excellent for small water effects, damp patches, gloss finishes on wet-looking surfaces, or touch-up repairs on existing water features. For larger bodies of water, conventional resin is usually more forgiving, more predictable, and often cheaper once you’re working at any meaningful scale.
Scenic Pour Products — convenience over performance
Products like Woodland Scenics Realistic Water sit in a comfortable middle ground.
They remove the complexity of mixing and chemical reactions — you simply pour and leave them alone. For many layouts, that convenience is more valuable than absolute realism.
They’re designed for shallow pours, so depth builds gradually with multiple layers. Some shrinkage while curing is normal, which catches people out the first time, but working in stages solves that easily.
They’re particularly well suited to streams, ponds, and background water features where you want something reliable without too much effort.
PVA Glue — underrated and often sufficient
PVA, wood glue, doesn’t have the glamour of specialist products, but it repays a closer look. Its main advantage is that it behaves exactly how a lot of inland water actually looks — slightly murky, not quite transparent, with a surface that catches light softly rather than with a hard glassy sheen.
As I explained here, it dries slightly translucent rather than crystal clear, and shrinks as it cures. For shallow, murky water, puddles, marshy areas, or damp ground, those characteristics are features rather than flaws. The shrinkage is worth understanding though: thin layers are essential, both because thicker applications shrink more and can crack or pull away from edges, and because the drying time increases significantly with depth. Working in multiple thin coats — each fully dry before the next — gives far better results than trying to fill a feature in one go.
Tinting PVA before pouring opens up a lot of possibilities. A small amount of ink or acrylic paint stirred in allows you to match the colour to the groundwork underneath rather than relying entirely on what’s painted on the base.
Diluted brown or green, used sparingly, can produce a convincing canal or ditch finish at almost no cost. The colour should be subtle — PVA is translucent, not opaque, and the base showing through is part of what makes it work.
It’s also genuinely useful as a testing material. Because it’s cheap and forgiving, you can experiment with colour mixes, layer depths, and base treatments before committing to something more expensive and less reversible.
More than once I’ve used PVA to work out exactly what a feature needs before going back in with resin to finish it properly — and occasionally discovered the PVA result was good enough to leave alone. Although I usually top it off with a hard varnish layer to protect it and give it a sheen finish.
Acrylic Gels — surface realism
Gels and heavy viscous model water materials, such as Woodland Scenics Liquid Water Effects, are often mistaken for water products, but they’re really texture products.
Their strength is movement — ripples, turbulence, waterfalls, disturbed water around structures, even small waves — and they hold their shape while drying, so you can sculpt surface detail directly.
A common approach is combining materials: resin or poured water for depth, then gel on top to bring the surface to life. Even a tiny amount of texture can make a scene feel more dynamic. They’re particularly effective for ripples and waves, as seen here in a previous article on water effects.
A similar effect can be achieved with thin wet tissue paper laid over a base layer such as resin and shaped while drying — one of those techniques that looks unlikely until you try it.
Colour — why green and brown usually win
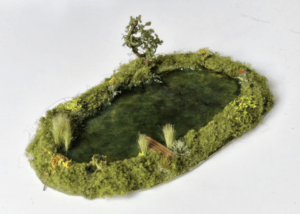
One of my model railway ponds, complete with green water
One thing that surprises people is how rarely water should actually be blue on a model railway. This is one of my pet gripes when looking at my layouts from early years and an argument I regularly have with my wife when she sees my water features. She insists it should be blue but look at any inland water feature – stream, pond, river, lake etc – and they’re rarely, if ever, blue.
The reason behind this is science. And if I remember my science lessons at school, I’m reminded water itself is almost colourless. What we see depends on light, depth, and what’s suspended in it. Light contains multiple wavelengths, and as it passes through water or ice, some colours are absorbed more than others. Reds fade first, while blue travels further, which is why deep clear water — and thick ice — can appear blue.
But most railway water isn’t deep and clear. It’s shallow, slow-moving, and full of life or sediment.
Green tones often come from algae and vegetation. Brown tones come from silt and mud. Canals, drainage ditches, ponds and rural streams across the UK tend to fall somewhere in that range, which is why green and brown bases usually look more convincing than bright blue as you can see with my model railway scale ponds.
The colour can be created from the painted groundwork underneath rather than the clear layer itself. Darker tones toward the centre, lighter edges, and subtle variation make a big difference.
Interestingly, that same light behaviour is what creates the blue tones you see in thick ice. Adding deeper blue into recesses and cracks, with lighter frost tones on the surface, creates the impression of thickness — something I keep in mind when designing and making my ice world wargaming terrain pieces.
A word on resin and safety
Resin is the one product in this list that asks for a bit of respect. While it’s curing it can release fumes, and the liquid components can irritate skin or cause sensitivity with repeated exposure — something that tends to creep up on people who don’t think it’ll be a problem until it is. Nitrile gloves and decent ventilation are sensible minimums. If you’re working in an enclosed space, a mask or respirator is worth the minor inconvenience.
Once it’s fully cured it’s stable and inert, so the concern is really just during the pour and the wait. The other products — PVA, gels, scenic pours — are fairly benign by comparison and don’t need much beyond basic common sense and following the instructions.
So which one is best?
It depends entirely on what you need:
- Large, deep water → two-part resin
- Small details → UV resin
- Simple shallow areas → scenic pour products
- Muddy or budget scenes → PVA
- Surface movement → gels
Most people who’ve been doing this for a while end up using several products on the same scene, and I think that’s probably the right approach. Trying to find one product that does everything is a bit like asking which brush is best — it misses the point.
I’ve used resin, gel, PVA and scenic pour products all on the same layout at different points, sometimes on the same water feature. None of it is that complicated once you know what each one does.
The bit that actually takes time is the looking. I’ve got folders full of photos of ponds and drainage ditches that most people would find baffling. But that’s where it comes from — noticing how a puddle sits differently from a pond, how canal water shifts colour from the centre to the edge, how light hits moving water versus still. Get that right in your head first and the product choice almost takes care of itself.
> Get more guides on modelling water and model railway building with my free email newsletter. Join now and get 5% off your first order.

Andy is a lifelong modeller, writer, and founder of modelrailwayengineer.com and its sister site. He has been building model railways, dioramas, and miniatures for over 30 years. His passion for model making and railways began when he was a child, building his first layout at the age of seven.
Andy’s particular passion is making scenery and structures in 4mm scale, which he sells commercially. He is particularly interested in modelling the railways of South West England during the late Victorian era, although he also enjoys making sci-fi and fantasy figures and dioramas.
When not making models, Andy lives in Surrey with his wife and teenage son. Other interests include history, science fiction, photography, and programming. Read more about Andy.